DeepFA AI API Documentation
for developers
Integrate DeepFA's AI capabilities into your application, website or service. Advanced text generation, image creation, smart chatbot building, audio file transcription and more — all via a standard REST API with JSON output. Full documentation includes code examples in 6 programming languages.
DeepFA AI API for Developers and Businesses
The DeepFA AI API is a comprehensive, standard REST interface that enables developers to integrate advanced AI capabilities directly into their applications, websites and services — without requiring machine learning expertise. From creative and professional text generation with ChatGPT, Claude and Gemini models to artistic and realistic image creation, building intelligent chatbots with natural conversation ability, accurate audio file transcription, support ticket management and affiliate sales programs — all accessible through 30+ standard API endpoints with JSON output.
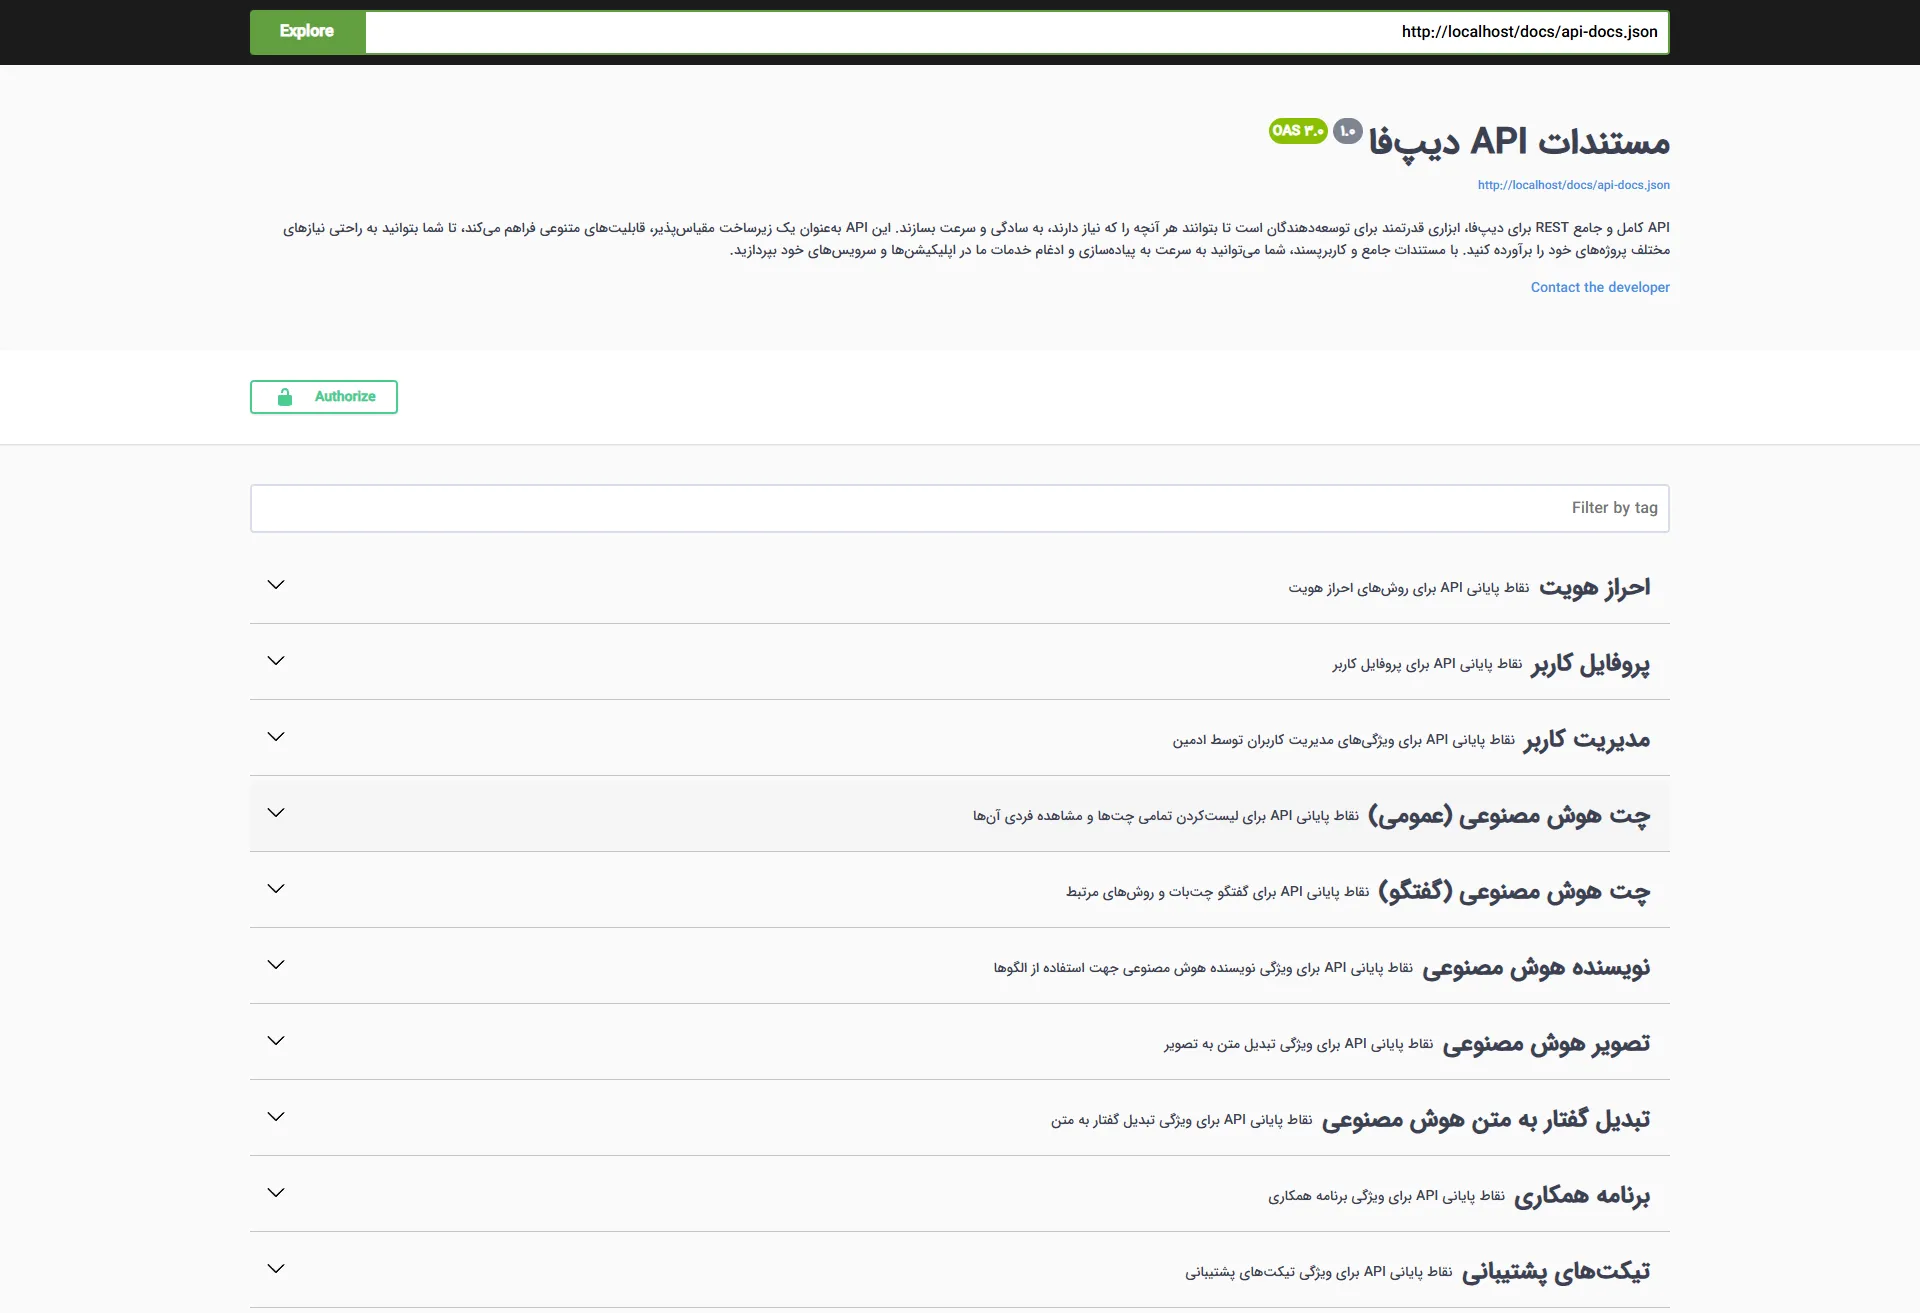
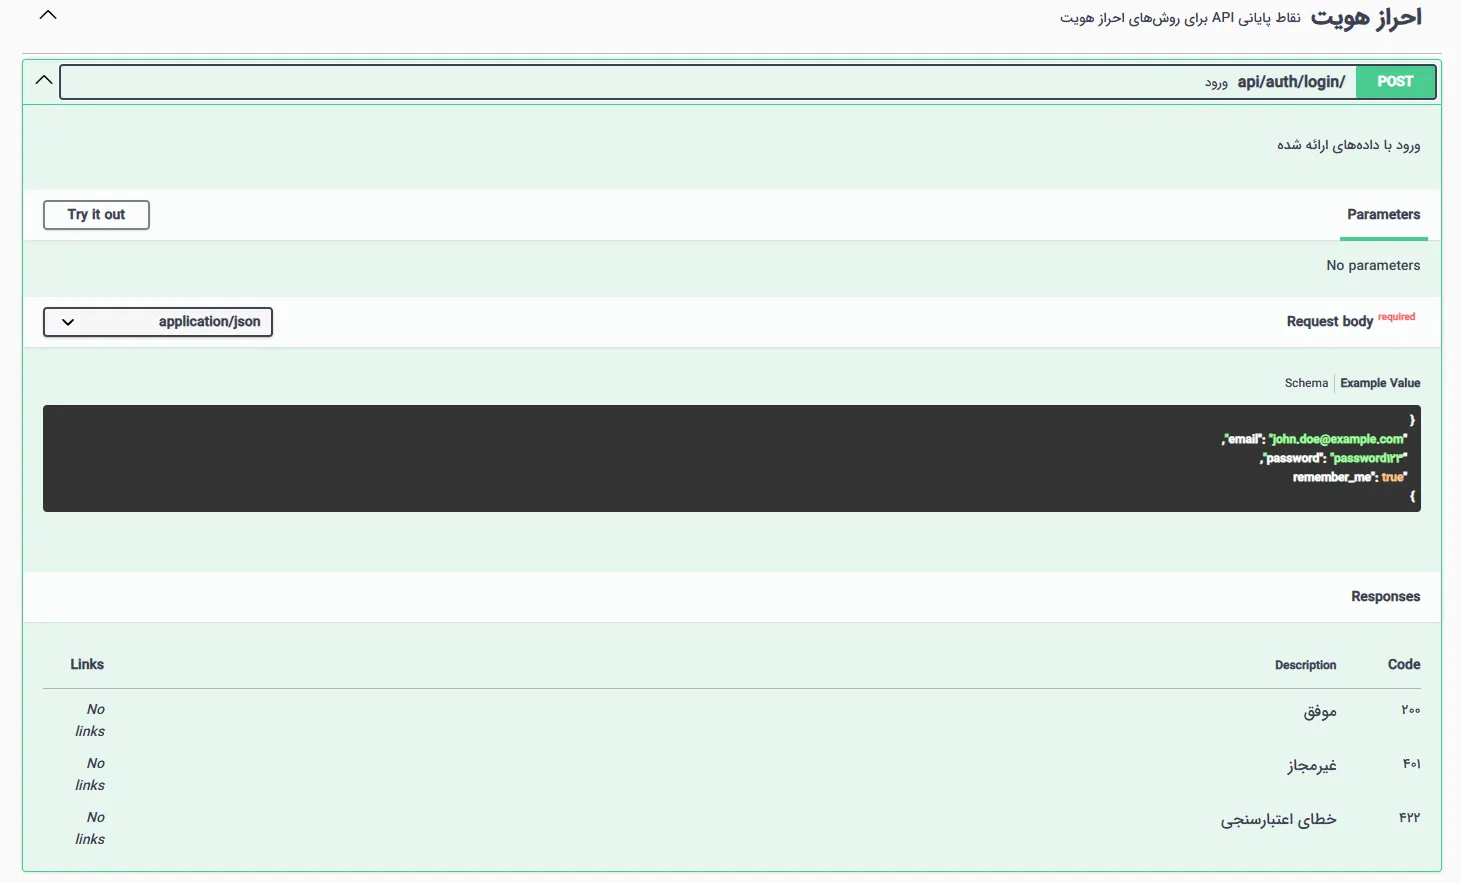
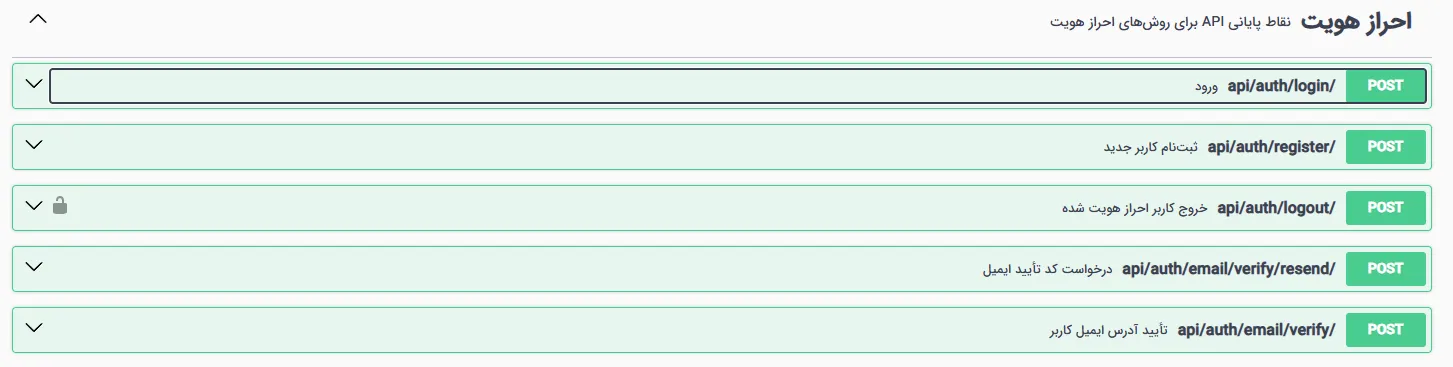
The DeepFA API authentication system is built on OAuth2 with Laravel Passport, one of the most secure and widely-used authentication standards in the software industry. Complete interactive Swagger documentation is available at /api/v1/documentation/en, allowing you to test all API endpoints directly from your browser without writing a single line of code — change request parameters and see real responses instantly.
The DeepFA API is compatible with all common programming languages including Python, JavaScript, PHP, Go, Ruby and Java. Ready-made code examples in 6 different languages are provided in the documentation section so you can send your first API request in under 5 minutes. API responses and error messages are available in both Persian and English, making the DeepFA API suitable for both local and international projects.
Why the DeepFA AI API?
Built with developer needs in focus — easy to start, secure to use and scalable for growth.
Secure OAuth2 Authentication
Industry-standard authentication with encrypted access tokens and automatic refresh capability. Your account security is guaranteed.
Standard JSON Output
All API paths return standard JSON output, compatible with any programming language and framework.
Interactive Swagger Documentation
Complete documentation for all paths with direct request testing from the browser, no coding required.
Persian & English Support
Responses, error messages and documentation in both Persian and English — suitable for local and international projects.
Automatic List Pagination
All list-returning paths support standard pagination. Manage large data volumes without complexity.
Role-Based Access Control
Admin paths are secured with separate protection layers. Regular user and admin access is fully segregated.
All DeepFA AI API Endpoints
30+ ready API endpoints across 8 categories — full documentation for each in Swagger.
Quick Start in 6 Programming Languages
Complete code samples for user login and AI image generation — two of the most common DeepFA API operations.
# Login and get access token
curl -X POST https://deepfa.ir/api/auth/login \
  -H "Content-Type: application/json" \
  -d '{
    "email": "user@example.com",
    "password": "your_password"
  }'

# Generate an AI image (use token from login)
curl -X POST https://deepfa.ir/api/v1/image/generate \
  -H "Authorization: Bearer YOUR_ACCESS_TOKEN" \
  -F "vendor=openai" \
  -F "prompt=A futuristic city at sunset, photorealistic" \
-F "resolution=1024x1024"// Login and get access token
const loginRes = await fetch('https://deepfa.ir/api/auth/login', {
method: 'POST',
headers: { 'Content-Type': 'application/json' },
body: JSON.stringify({
email: 'user@example.com',
password: 'your_password'
})
});
const { access_token } = await loginRes.json();
// Generate an AI image
const formData = new FormData();
formData.append('vendor', 'openai');
formData.append('prompt', 'A futuristic city at sunset, photorealistic');
formData.append('resolution', '1024x1024');
const imgRes = await fetch('https://deepfa.ir/api/v1/image/generate', {
method: 'POST',
headers: { 'Authorization': `Bearer ${access_token}` },
body: formData
});
const { image_url, image_id } = await imgRes.json();
console.log('Generated image:', image_url);import requests
BASE_URL = "https://deepfa.ir"
# Login
login = requests.post(f"{BASE_URL}/api/auth/login", json={
"email": "user@example.com",
"password": "your_password"
})
token = login.json()["access_token"]
headers = {"Authorization": f"Bearer {token}"}
# Generate AI image
response = requests.post(
f"{BASE_URL}/api/v1/image/generate",
headers=headers,
data={
"vendor": "openai",
"prompt": "A futuristic city at sunset, photorealistic",
"resolution": "1024x1024"
}
)
result = response.json()
print(f"Image URL: {result['image_url']}")
print(f"Image ID: {result['image_id']}")<?php
$baseUrl = 'https://deepfa.ir';
// Login
$ch = curl_init("$baseUrl/api/auth/login");
curl_setopt_array($ch, [
CURLOPT_POST => true,
CURLOPT_RETURNTRANSFER => true,
CURLOPT_HTTPHEADER => ['Content-Type: application/json'],
CURLOPT_POSTFIELDS => json_encode([
'email' => 'user@example.com',
'password' => 'your_password',
]),
]);
$login = json_decode(curl_exec($ch), true);
$token = $login['access_token'];
curl_close($ch);
// Generate AI image
$ch = curl_init("$baseUrl/api/v1/image/generate");
curl_setopt_array($ch, [
CURLOPT_POST => true,
CURLOPT_RETURNTRANSFER => true,
CURLOPT_HTTPHEADER => ["Authorization: Bearer $token"],
CURLOPT_POSTFIELDS => [
'vendor' => 'openai',
'prompt' => 'A futuristic city at sunset, photorealistic',
'resolution' => '1024x1024',
],
]);
$result = json_decode(curl_exec($ch), true);
echo "Image URL: " . $result['image_url'];
curl_close($ch);const axios = require('axios');
const FormData = require('form-data');
const BASE = 'https://deepfa.ir';
async function main() {
// Login
const { data: auth } = await axios.post(`${BASE}/api/auth/login`, {
email: 'user@example.com',
password: 'your_password'
});
const headers = { Authorization: `Bearer ${auth.access_token}` };
// Generate AI image
const form = new FormData();
form.append('vendor', 'openai');
form.append('prompt', 'A futuristic city at sunset, photorealistic');
form.append('resolution', '1024x1024');
const { data: img } = await axios.post(
`${BASE}/api/v1/image/generate`,
form,
{ headers: { ...headers, ...form.getHeaders() } }
);
console.log('Image URL:', img.image_url);
console.log('Image ID: ', img.image_id);
}
main().catch(console.error);package main
import (
"bytes"
"encoding/json"
"fmt"
"mime/multipart"
"net/http"
)
const base = "https://deepfa.ir"
func main() {
// Login
body, _ := json.Marshal(map[string]string{
"email": "user@example.com",
"password": "your_password",
})
res, _ := http.Post(base+"/api/auth/login",
"application/json", bytes.NewBuffer(body))
var auth map[string]interface{}
json.NewDecoder(res.Body).Decode(&auth)
token := auth["access_token"].(string)
// Generate AI image
var buf bytes.Buffer
w := multipart.NewWriter(&buf)
w.WriteField("vendor", "openai")
w.WriteField("prompt", "A futuristic city at sunset, photorealistic")
w.WriteField("resolution", "1024x1024")
w.Close()
req, _ := http.NewRequest("POST",
base+"/api/v1/image/generate", &buf)
req.Header.Set("Authorization", "Bearer "+token)
req.Header.Set("Content-Type", w.FormDataContentType())
client := &http.Client{}
resp, _ := client.Do(req)
var result map[string]interface{}
json.NewDecoder(resp.Body).Decode(&result)
fmt.Println("Image URL:", result["image_url"])
}{
"access_token": "eyJ0eXAiOiJKV1QiLCJhbGciOiJSUzI1NiJ9...",
"token_type": "Bearer",
"expires_at": "2026-06-08 14:30:00"
}
{
  "image_id": 1842,
  "image_url": "https://deepfa.ir/storage/images/ai/img_x7k2m.png",
  "status": true
}
{
  "words": 145280,
  "images": 342,
  "contents": 891,
  "synthesized": 56,
  "transcribed": 23,
  "codes": 178
}
{
  "status": true,
  "text": "This is the transcribed text from the audio file..."
}
{
  "total_commission": 142.50,
  "total_referred": 18,
  "total_withdrawal": 80.00,
  "referral_code": "DEEPFA_XK92M",
  "currency": "$"
}
{
  "error": {
    "email": ["The email field is required."],
    "password": ["The password field is required."]
  }
}
Send Your First API Request in Four Simple Steps
From sign-up to receiving your first API response in under 5 minutes — no complex setup required.
Create a free DeepFA account
Create a free account. You need an active and verified account to use the API.
Get your access token
Send a request to /api/auth/login to log in. Extract the access token from the response.
Browse interactive documentation
Interactive API docs are at /api/v1/documentation/en. Browse and test all endpoints directly.
Send your first request
Place the access token in the Authorization header with Bearer prefix and send your first request.
A Look Inside the API Interface
Simple and practical interface — click any image to enlarge.
Frequently Asked Questions About the DeepFA AI API
Answers to common developer questions about using the API — contact support if you don't find your answer.
Get Your API Key and Start Building Today
Free sign-up, instant access token and full access to interactive Swagger documentation